In one case you lot've hung your sheetrock, taped and mudded the joints, and sanded the mud shine, there'southward withal an of import finishing step before your drywall project is consummate. You lot'll need to decide on a surface treatment in order for it to look complete – no one wants to see the mudded joint lines and blank sheets of drywall in their living room. In that location are perhaps dozens of different ways to apply texture to walls and ceilings. Some are easier than others, some crave special tools, and still others are only suitable for sure kinds of environments or surfaces. In this post, we'll look at a few of the virtually mutual techniques that are advisable for DIYers and outline some full general principles for finishing your drywall project equally professionally as possible.
Earlier Yous Kickoff: Choosing a Texture and Practicing It
Different drywall textures tin can give your room a totally a unlike look, and so take some time to make up one's mind what statement you lot want to brand. Totally smooth texturing is a timeless look and especially appropriate for modern homes, since its lack of internal shadows matches the vivid, open up tendency in home blueprint of the concluding few years. The downside is that a smoothen finish is both difficult and labor-intensive to achieve. Whatever mistakes in a smoothen terminate, however small, will be obvious, and then it is often best to leave smooth finishes to the pros. Most other texture techniques are more forgiving for beginners. Some textures provide a strong aesthetic choice that is associated with a sure era or fashion, then consider what volition match your home best. Thicker, heavier textures can also save you a lot of fourth dimension because you lot won't need to skim coat the wall, effectively saving you an entire pace and that may be an important consideration too.
Many drywall textures are elementary to apply but will be hard or time-consuming to correct once the mud dries. Depending on the technique you pick and the products yous employ to achieve the look, that time to dry tin be quite short, and then information technology's of import to practise a chip earlier you start the project. Any of these techniques tin be easily practiced on a large piece of cardboard until you become the hang of it.
I last note about practicing textures: the consistency of the mud volition make a big difference in how the final texture looks. In add-on to practicing to learn the technique, try out a few different consistencies of mud to see which you like best. Yous should know whether you lot want thinner or thicker mud and what the final production volition expect like before you commit to doing a whole wall or room.
First Steps: Setting Upwards
Make no fault: drywall texturing will be a scrap messy regardless of what technique you choose. Before you outset any kind of texturing work, it'south important to ready your space. Lay out drop cloths to encompass the whole floor around the work area. If you're doing a ceiling, consider protecting the whole floor of the room (seriously!). Remove anything that can exist removed (furniture, etc.) and mask whatever fixtures, wall sconces, or other items that can't exist moved out of the room to protect them from the mess.
One time the room is protected from the splash, ready your tools. Some techniques require only hand tools, while others (indicated below with a *) will require some sort of spraying tool to apply the texture. These sprayers tin can exist powered by compressed air or an electric motor. Some textures are even available in dispensable cans, similar to spray paint, for those who don't want to rent a sprayer.
Next Steps: Applying the Texture
Stucco Event – One of the simplest techniques is to sparse drywall mud to the consistency of thick pancake concoction then apply it with a sponge, trowel, or a deep-nap roller. This will create a lightly stippled look reminiscent of stucco and is one of the near forgiving techniques because it doesn't have a clearly divers design. Typically, though, stucco await isn't not bad for walls that have been patched heavily because it isn't deep enough to adequately embrace the lines left past the repairs.
Each common drywall texture is accomplished through a different combination of tool and technique. Some of the most common are:
Comb –This technique is a great way to apparel upwards ceilings in more than elegant environments. Lay down a layer of mud and utilise a toothed trowel to create tidy ridges in the mud earlier information technology dries. Most commonly applied in a "half-fan" motif that gives an about art deco-like mode to the surface.
(c) Home Depot
Stomp Castor and Crows Feet – Both of these are basically the same technique and differ only in the tool used to achieve the finish. In both cases, you'll use a large brush loaded with mud, press it against the ceiling and pull downward sharply to pull away dramatic ridges in the mud in a random blueprint. The stomp castor style uses a special, single brush while the "crow'southward anxiety" technique uses a double brush to create pairs of focus points for the pattern. Because of the depth of the ridges and the visually "busy" design, this is a nifty option to cover heavily patched ceilings equally information technology hands hides irregularities.
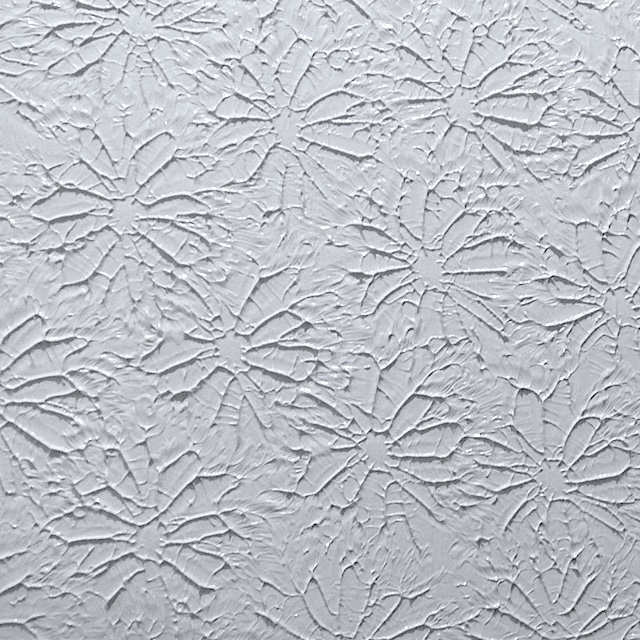
Skip Trowel – Some other dramatic technique that can be used to cover surfaces (walls also every bit ceilings) that have seen lots of repair is skip trowel. It is also great for beginners with a artistic center because it requires more than artful sense than difficult technique. Simply apply a smooth layer of mud on top of your sheetrock. Then, place your trowel nearly apartment (but not quite flat!) against the wall or ceiling and swirl it to create random, raised patterns in the mud. The superlative of the pattern will depend on how much mud yous put on in the first layer and the angle and pressure yous apply with the trowel. When working in pairs or on a team, only one person should apply the concluding texture to ensure consistency throughout. Heavier patterns are smashing for ceilings but lighter texture should be used on walls, where very deep or pronounced ridges can catch on dress or wear downwards unevenly.
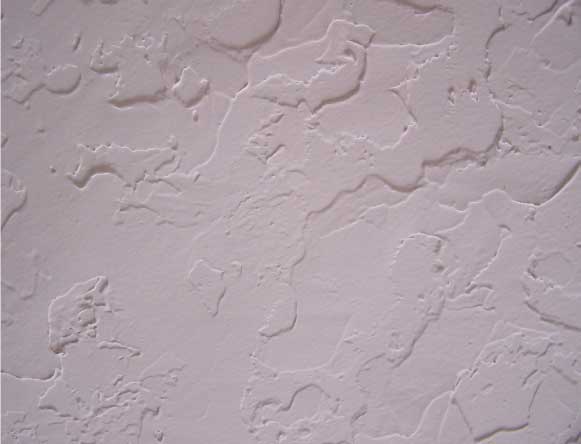
Knockdown –Not a technique unto itself, knockdown tin be practical to other textures to create a more subtle result. In this fashion, y'all use a pronounced texture (like stomp brush or either of the spray techniques below) and and then smoothen it partway with your trowel using gentle force per unit area. This creates a subtle version of the original pattern with much less shadowing on the surface. If you make up one's mind on a knockdown finish, you lot'll need to apply a thicker mud than you lot would otherwise apply for the texture you're knocking downward. Brand sure to allow information technology set before you knock it down: information technology shouldn't be hard but it needs to exist partially dry so you don't only wipe the texture away.
(c) iStockPhoto
Popcorn* – Less mutual in mod homebuilding but once very popular, the popcorn texture is an ambitious, heavy texture of rounded lumps applied to the surface. This consequence is achieved by the improver of pocket-size pieces of Styrofoam to the mud. The advantages of this style are that it tin comprehend very obvious mistakes and patches and that it provides light acoustical insulation (it was actually developed to dampen audio in restaurants but eventually made its way into homebuilding). The downsides are that information technology is a very strong look that may or may not go with your domicile and that it creates a heavy shadowing that tin can visually darken the infinite and brand paint colors popular less. Requires a compound sprayer. For bigger projects, consider renting a refillable sprayer while for smaller projects you tin buy spray cans of popcorn finish that are prepare to get. Typically used only for ceilings because the heavy texture can catch on clothes or even scratch the skin if yous rub against it.
(c) iStockPhoto
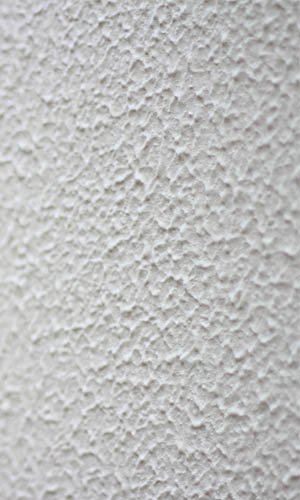
Orange Skin* – In some means visually similar to the popcorn finish above but much less aggressive, orangish peel has a dimpled, wrinkled appearance (much like an orangish skin). Unlike popcorn, however, it just uses thin mud to accomplish the texture with no added foam. It besides requires a sprayer with the appropriate nozzles, and then consult your local hardware store to discuss the project (there are different spray angles for walls and ceilings, for instance). Though used primarily for ceilings, its softer await and gentle curved surfaces brand information technology better suited to walls than popcorn texture.
(c) Habitation Depot
Summary
The last pace of any drywall installation projection is to create an attractive finished surface on meridian of the drywall panels. The easiest and least expensive way to practise this, particularly for anyone new to drywall, is to utilize hand tools and joint compound to employ a texture on top of the sheetrock. A perfectly smooth surface is possible but hard and all-time left to professionals. Piece of cake-to-use textures vary from a lightly stippled stucco effect to dramatic ridges and swirls that can hide imperfections in the drywall finishing beneath. For fifty-fifty more options, drywall sprayers allow y'all to deliver a range of textures using a power tool. Any of the heavier textures tin then be "knocked down" to create a subtler version of the same pattern. This is specially useful for walls, where aggressive texturing can create problems later – catching on apparel or even scratching the peel if end users aren't careful. On the other paw, the deeper the texture and more random the design, the better the textured finish tin hide imperfections from earlier phases of piece of work.


Post a Comment for "what tool is used to apply hand texture swirls"